This post contains affiliate links, and I will be compensated if you make a purchase after clicking on my links. There is no cost to you, and I only recommend products that I would use.
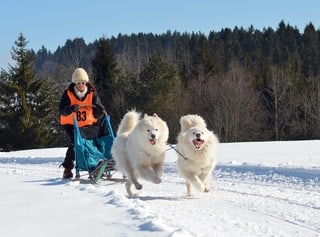
Dog sledding is a winter sport loved by humans and dogs alike. Watching a pack of joyful sled dogs running through the snow is an image that’s not soon forgotten.
Better than watching, though, is participating in dog sledding. There’s nothing like being behind a dog-powered sled coursing across a winter landscape.
But you don’t need a pack of huskies to enjoy the sport.
You just need one dog.
And a dog sled.
Anatomy of a Dog Sled
If you’re new to dog sledding or would like to know about the different parts of the sled and what they do, here’s a breakdown of a dog sled and the different parts that make it all work.
- Bed/Basket – the bed (aka basket) is the seat-like area in the center of the sled. It’s the place to stow gear and cargo. Some sled baskets can also hold a second rider.
- Runners – the runners serve as the “skis” of a sled. They provide traction as well as allowing the sled to slide over and through snow.
- Stanchions – the stanchions connect from the runners to the handlebar. Stanchions provide support to the bed of the dog sled as well as steer the sled. When you move the handlebar left or right, the stanchions move in the same direction to steer the sled on trails.
- Handlebar – the handlebar is the dog sled’s “steering wheel” and a sledder’s connection to the sled. This curved piece allows you to tilt the runners for a left or right turn, or just to hold steady on course.
- Brake – wandering how you slow down or stop a dog sled? You put on the brake. The brake is positioned in the center of the sled, below the back of the bed. There are different types of brakes, but they are all designed to drag or dig into snow and ice to help slow and/or help turn the sled.
- Brush bow – this is the curved piece that juts out at the front of a sled. It’s designed to keep sled and rider protected against possible collisions with trees and other obstacles.
How Much Does A Dog Sled Cost?
Less than you might think.
In fact, you can get started in dog sledding for under $500.
For that money, you can buy a basic dog sled and the two other pieces of gear you’ll need – a dog harness and a towline/gangline. With those three items, some warm clothing – and a dog – you’re ready to go.
Let’s take a look at two low-cost dog sleds, both from Wisconsin-based Affordable Dog Sleds.
Entry-Level Dog Sleds
Seeley Slider Dog Sled
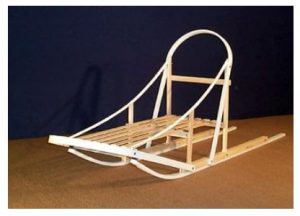
The Seeley Slider is a no-frills starter dog sled requiring some assembly. But don’t worry if you’re not a handyman or woman. All hardware is included and the holes are predrilled, so you can put the Slider together using a single phillips-head screwdriver and 7/16-inch wrench. Give yourself 2 to 3 hours to put the sled together.
The frame components of the sled are white ash, while the runners, handlebar and brush bow are high-density polyethylene (HDPE).
It doesn’t come with a brake or footpads, but these can easily added to the sled should you want to upgrade. If you’re looking to try dog sledding without a large investment, the Slider is a bargain sled.
See Current Price
Specifications:
- Suitable for teams of 1 to 3 dogs
- Length = 8-inches Brush Bow to Ski Tails
- Width = 20 inches to outside of Skis; 17 inches to inside of Skis
- Height = 36 inches Ground to Handlebar
- Weight = 22 pounds assembled
- Clearance Height = 10 inches
- Skis = 1-1/2 inches wide
- Seat = 40 inches long, 17 inches wide
- Wood = White Ash
- 3/4 inch by 1-1/2 inches HDPE Runners
- 1/2 inch by 1-1/2 inches HDPE Brush Bow and Handle Bar
J-N-A Dasher Dog Sled
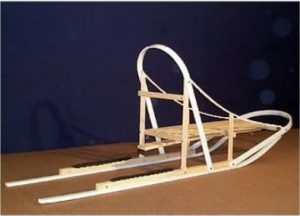
The Dasher is another starter sled that comes in kit form. Like the Slider, it comes ready-assemble, with all needed hardware and holes predrilled. A phillips screwdriver and 7/16-inch wrench are the only tools you need.
The Dasher is about $50 more than the Slider. But that extra money gets you two important upgrades: a traditional claw brake and foot treads for easier traction. The claw brake is 4-feet long and hinged in the center with a 1.5-inch iron claw. Apply the brake by stepping on it. The downward pressure from your foot and leg will push the claw into the snow.
There’s also a sturdy eye bolt fixed near the front of the basket that makes it a cinch to attach a towline or gangline.
This video highlights the J-N-A Dasher and demonstrates how to rig the sled.
You can purchase the Dasher and get free shipping here.
Specifications:
- Suitable for teams of 1 to 8 dogs
- Length = 8 inches Brush Bow to Ski Tails
- Width = 20 inches to Outside of Skis.
- Height = 36 inches Ground to Handlebar
- Weight = 29 pounds assembled
- Skis = 1-1/2 inches wide
- Foot Treads = 1-1/2 inches wide by 18 inches long
- Seat = 40 inches long, 17 inches wide
- Wood = White Ash
- 3/4 inch by 1-1/2 inches HDPE Runners
- 1/2 inch by 1-1/2 inches HDPE Brush Bow and Handlebar
- Brake = Traditional Claw Brake
- Hitch Bolt = 1/2-inch by 4-inch Eye Bolt
Other Things You Need
As mentioned earlier, beside a sled, you’ll also need a harness and line to connect your dog(s) to the dog sled. Here are my recommendations.
Northern Howl X-Back Weight Pulling Dog Harness
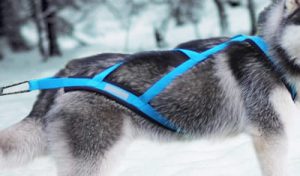
It’s important to purchase a harness that’s comfortable for your dog to wear and that provides a secure point of attachment to the line and sled. The Northern Howl X-Back Harness is a great choice for dog sledding, particularly with long-haired breeds such as Siberian huskies. This very high-quality harness features air-mesh padding in the neck and chest regions, This is gentler on your dog’s skin and coat. The sides and neck area also feature reflectors for easy visibility. You can get this harness in six different sizes, and it’s great not just for dog sledding but also for canicross, skijoring, biking and more. Find the right size for your dog here.
Towline/Gangline
The towline or gangline is what connects your dog(s) to the sled. Think of it as the “leash” of a dog sled. You can use a single towline if you’re sledding with just one dog. If you have two or more, then you’ll want to buy a gangline.
For sledding with a single dog, the 10-foot towline from Ultra Paws is a sturdy line at a very reasonable price.
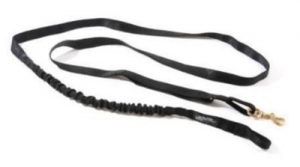
If you’re going to attach a line like this to a sled bolt, you’ll want to attach a carabiner to the handle end so you can clip it to the bolt.
If you plan to sled with two or more dogs, I would check out the gangline options from Affordable Dog Sleds. You can find starter kits as well as team sections.

